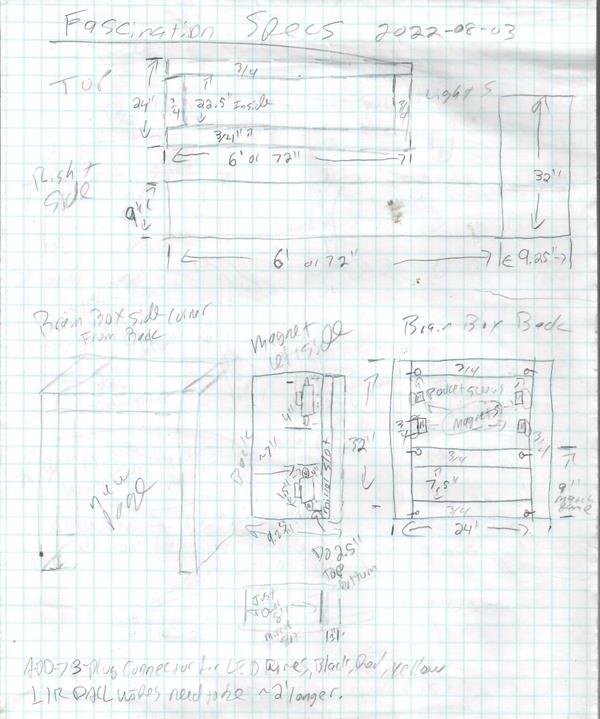
Sketches
Here are the scanned documents of sketches when creating the game.
I will have to go through and make an overview level of pics then have the real ones in the build process. This is just for my reference right now.
Also note, there's a Version 2 (crash detection senors) and Version 3 (IR Breakbeam Sensors, currently working on)
Box Frame Designs

4x8' Plywood cut layout.
Have HomeDepot cut 24" (plus blade gap) to make a 2x8 long piece.
Ability to make main box 1.5" wider if needed, going to try 6.5" first.
Also supports inset and outset door.
I was not able to cut a single piece of 3/4" for a solid door, but this will decrease weight.
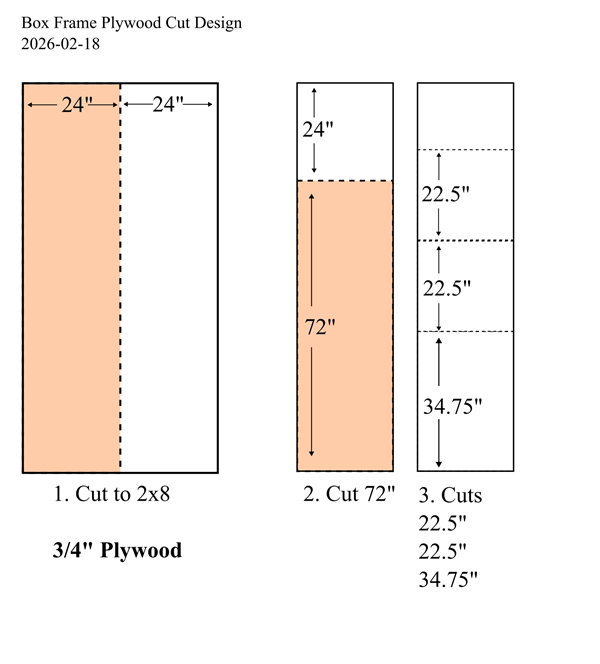
4x8' Plywood cut steps.
Have HomeDepot cut 24" to make a 2x8 long piece.
Make the next 3 cuts at 34.75", 22.5", 22.5".
If getting the 1/4" plywood, cut out: 24" x 72" and 24" x 22.75". Add to picture later.

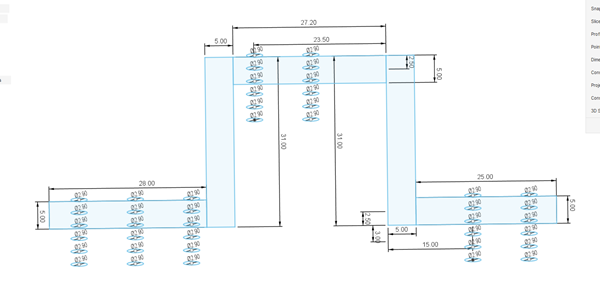
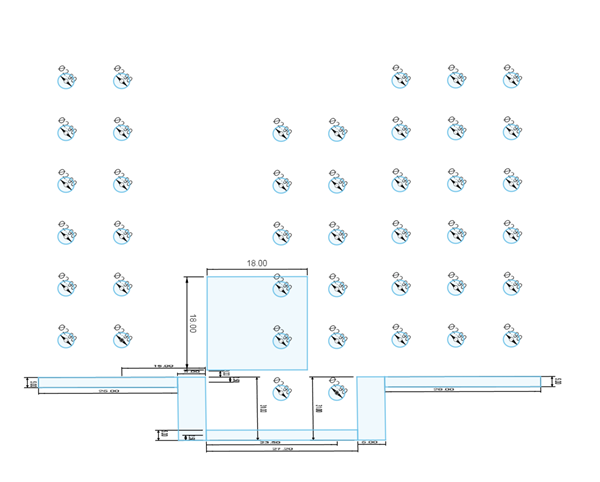
Playfield Measurements
Measurement Distance between the supports and layout.
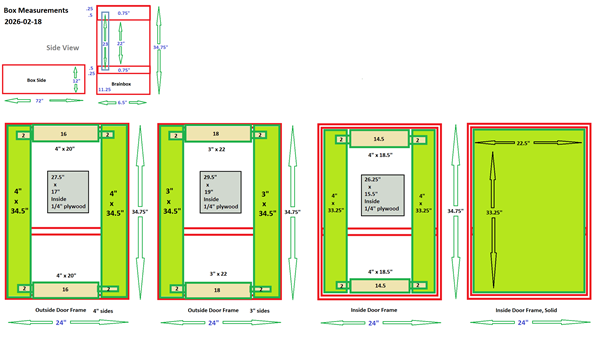
Brainbox Door sketch idea
Probably final measurements. But it a tad smaller for easier opening.
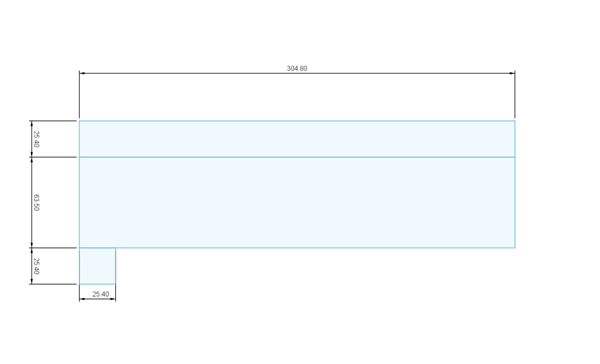
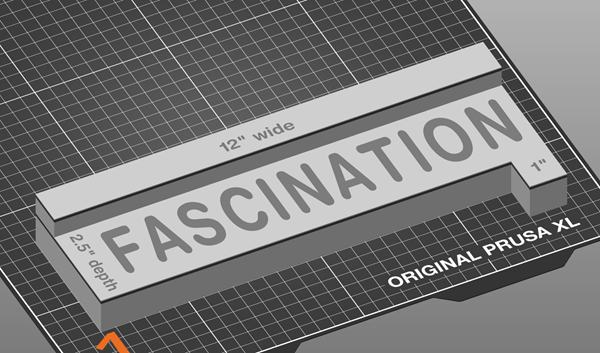
2.5" Spacer Tool
CAD design.
2.5" Spacer Tool
Measurements
2.5" Spacer Tool
Slicer labeled.
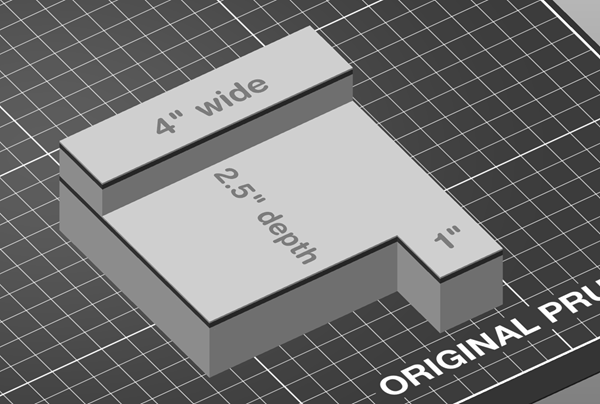
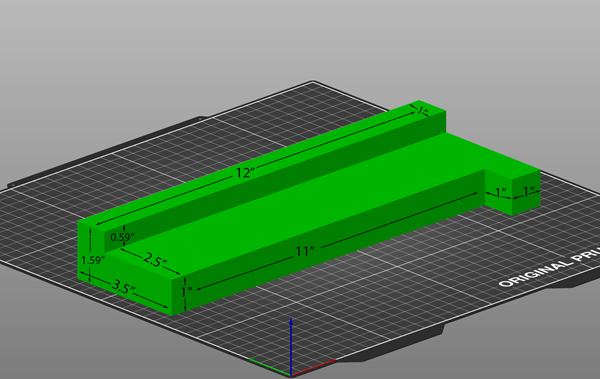
2.5" Spacer Tool, 4" wide
Slicer labeled.

2.5" Spacer Tool, 6" wide, No 1" Spacer Block
This will be used on pieces, like the drop holes supports, where a corner is needed.
Brain Box Marking Templates
Template for making location of LEDs, Glass "holes", and Foam Cutouts.


Holes 2 inch Template Dovetail Cutouts Marked
xxx
Sketch Marking object
xxx
Drop Holes Design Sketches
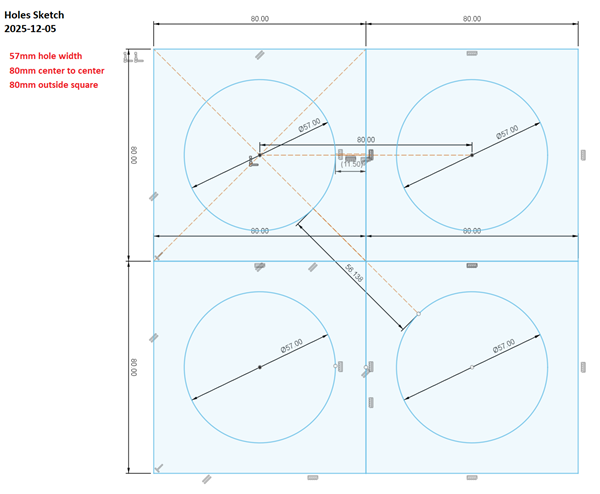
Holes Sketch 2025-12-05
Just holes/border.

Holes Sketch v3 2025-12-10
With sensor cutouts, before wire channeling.

Drop Holes Magnet Locations 2026-01-29
5mm depth cut out for 60x10x3mm magnets.

Hole Depths for Sensor Screws
Different options for depth measuring.
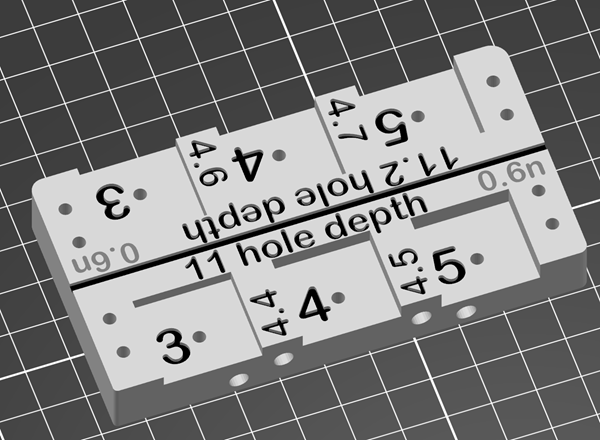
Comparing hole depths for sensors
Test block to see if 12 / 13 mm deep holes will work.
Drop Hole V3 Bottom CAD

Drop Hole V3 Top CAD
Holes_3D v3 2026-01-09
Holes 3D Expanded.
5mm Cut Out
Missing screw hole for #8 x 1 - 1/4" Spax Screws
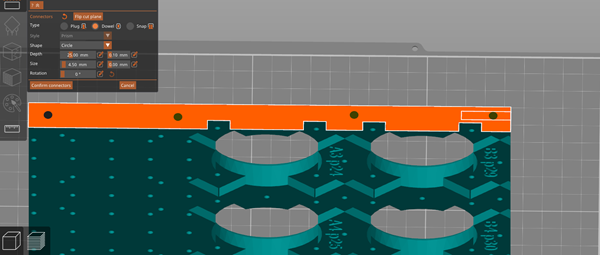
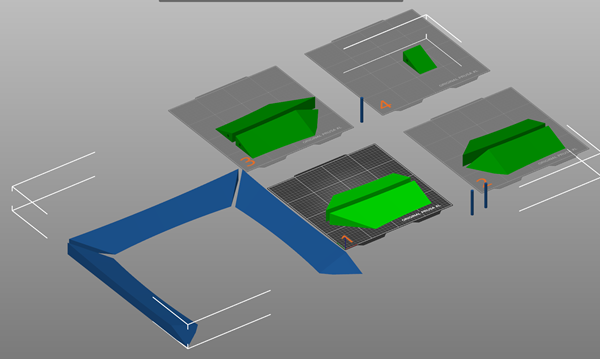
Drop Holes 3D Sliced
There are two possibilities of slicing, one through the holes and one not. Initial thoughts are slicing through the holes so less warpage, little areas to smooth/clean up.... but not sure, other thoughts are not slicing through the holes so they'll be perfectly round and might be easier to sand the surface. So I'm listing both cutting options below.

Cut Measuring NOT through holes
xxx
1st Cut at 248
xxx

1st Cut Connectors
xxx

2nd cut at 320
xxx

2nd Cut Connectors
xxx
3rd cut, also at 320
xxx
3rd Cut Connectors
xxx

Not Through Holes cut to slice
xxx

Sliced showing connector holes
xxx

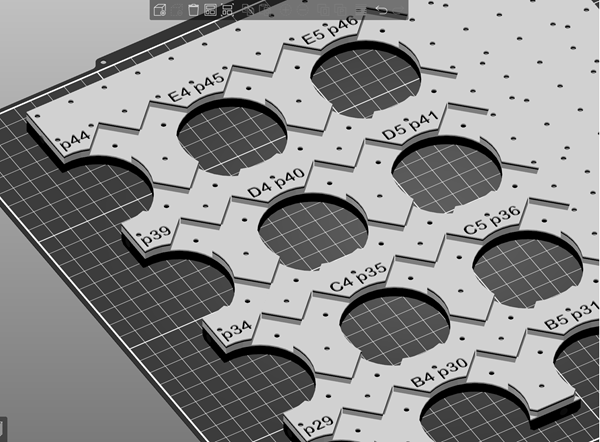
Drop Hole Connectors_3D v3 2026-02-22
4.5 holes for Threaded Rod connecting drop holes together.
Place off center of screw holes to not interfere.
Drop Hole Colored Idea
Testing different colors for printing options.

Drop Hole Cut Through Holes
Drop Hole Colored Idea
Testing different colors for printing options.
Drop Hole Sensors

IR Breakbeam Sensor Sketch 2025-12-04
Sketch of actual part.

IR Breakbeam Sensor_3D 2025-12-04
Sketch of actual part.
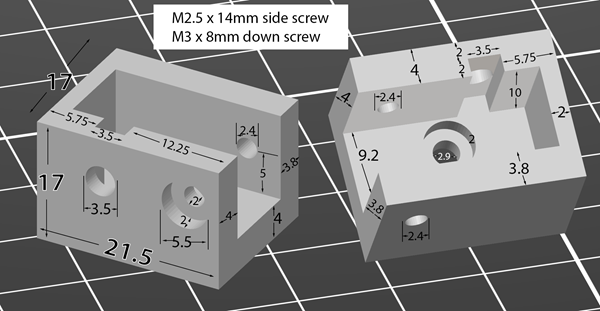
IR Sensor Case 2025-12-09
Mount for IR Sensor onto the Drop Hole
IR Breakbeam Sensor Case 2026-02-25
Use the 5mm 'base' to sit flush with the top inside the 5mm drop hole depth.
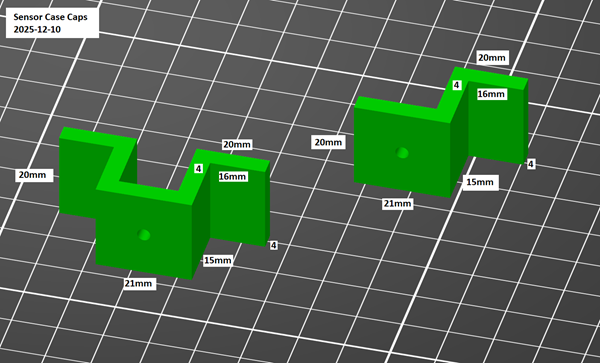
Sensor Case Caps 2025-12-10
Option hold downs for Sensors.
.jpg)
Sensor Cap Single Sided
Connects to a single sensor.
.jpg)
Sensor Cap Double Sided
Connects 2 sensors back to back.
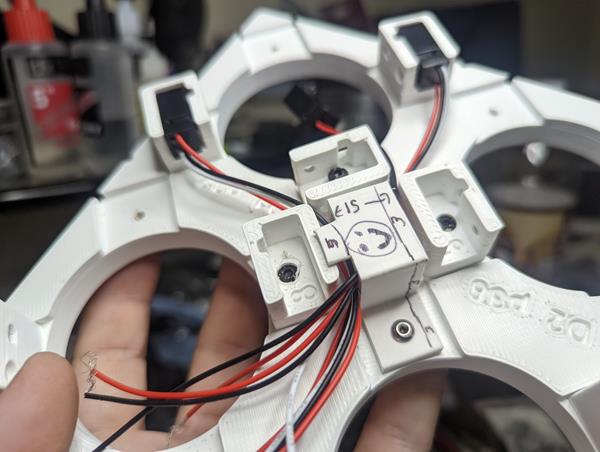
Wire Cap
Still looking into options.
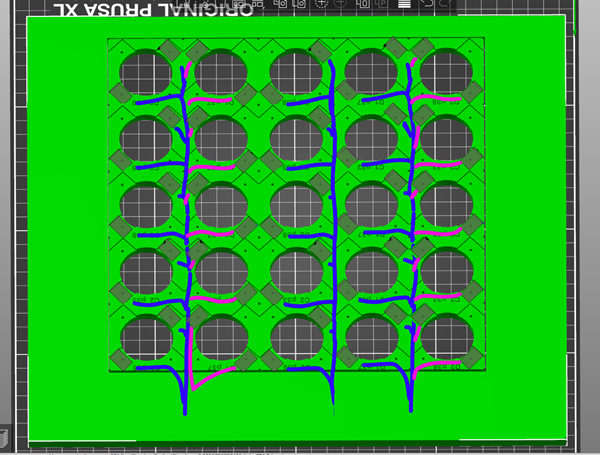
Drop Hole Wiring Center Wires
My first thoughts, need to product test.
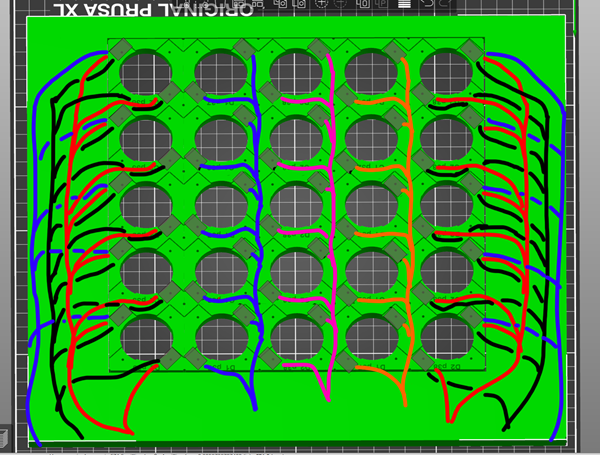
Drop Hole Wiring Center Wires All Channels
Option 2, less wires per channel, easier to fix.
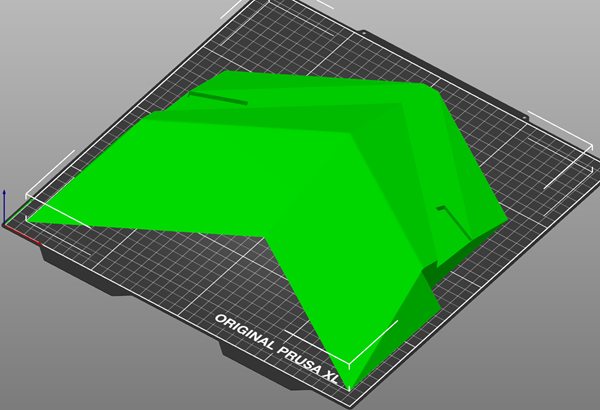
Downramp
Currently, the end of the downramp sits on the 7mm Playfield (Floor planking) the slides into the Drop Holes w/ Threaded Rods.
I thought about making the Down ramp go all the way to the cross support and add the ability to put own spacers in, but then it wouldn't slide forward w/ the threaded rods.
So for now, use 7mm thick flooring all the way up to the drop holes.

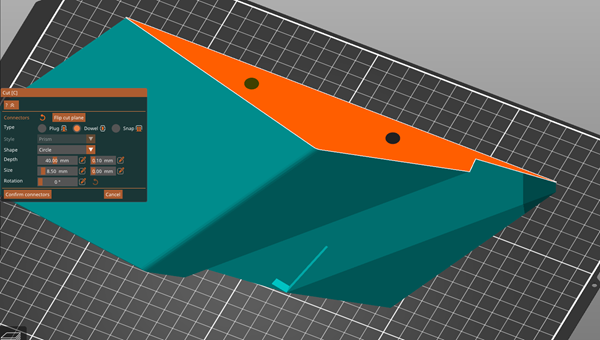
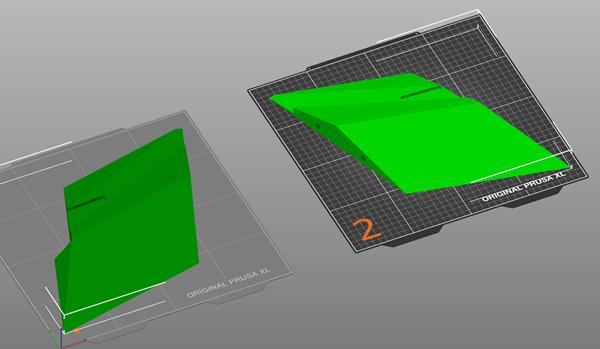
Downramp v3
Cut in the Center
Choose Dowel 4.5 Width, 25mm depth each side (50mm total)

Downramp v3 Cut
Split into two pieces. Use the Threaded Rod to connect.
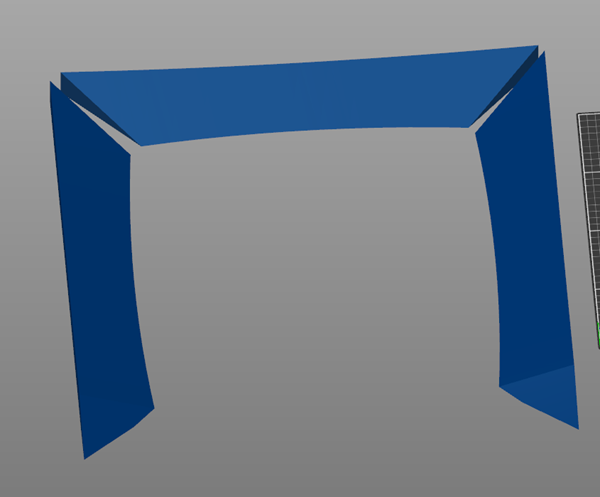
Main Hump
Main Hump v3
Has cutout slots for magnets
Main Hump Cut Info
Dowel Cut Outs 8.5 x 40mm
Main Hump Cut Info
Final cut to print
Drop Holes Humps
Currently, the end of the downramp sits on the 7mm Playfield (Floor planking) the slides into the Drop Holes w/ Threaded Rods.
I thought about making the Down ramp go all the way to the cross support and add the ability to put own spacers in, but then it wouldn't slide forward w/ the threaded rods.
So for now, use 7mm thick flooring all the way up to the drop holes.
Hump Layout
Pre Cut

Hump Cut Info
Cut in half.
Add Dowel Cut Outs 8.5 x 40mm, making it 80mm total.
Print Layout
Buttons - Game Select
Starting to work on the playfield.
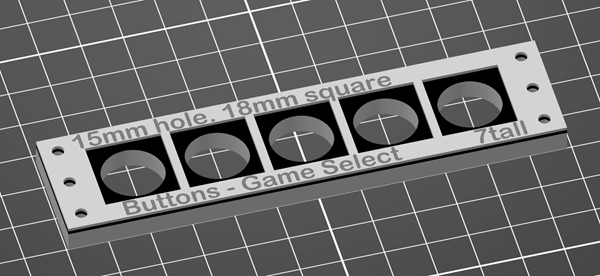
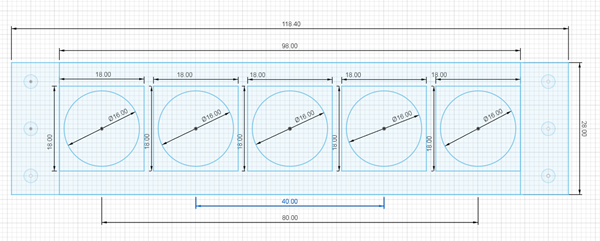
16mm hole, 18mm square
Test Draft
LCD
Starting to work on the playfield.
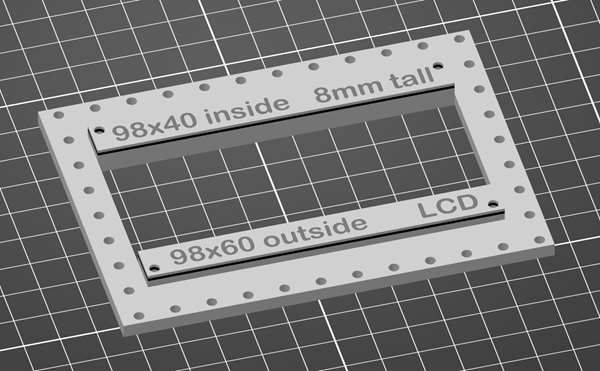
98x40 mm inside hole, 8mm tall
Test Draft
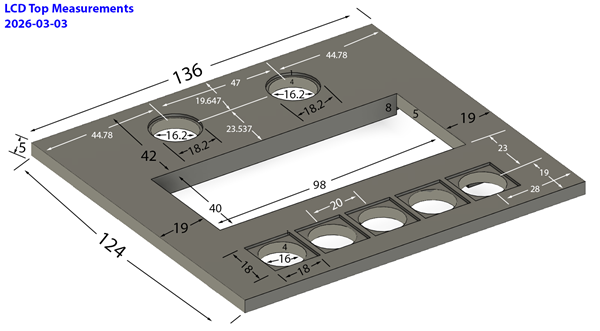
LCD Top
Measurements
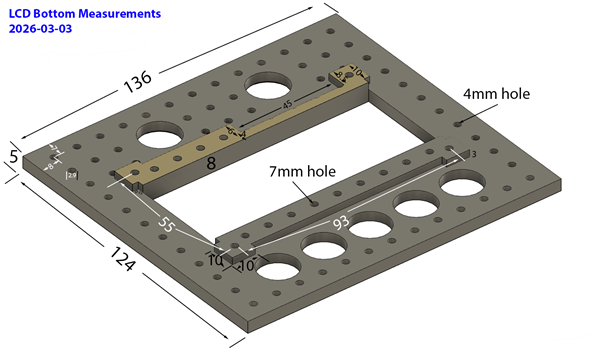
LCD Bottom
Measurements
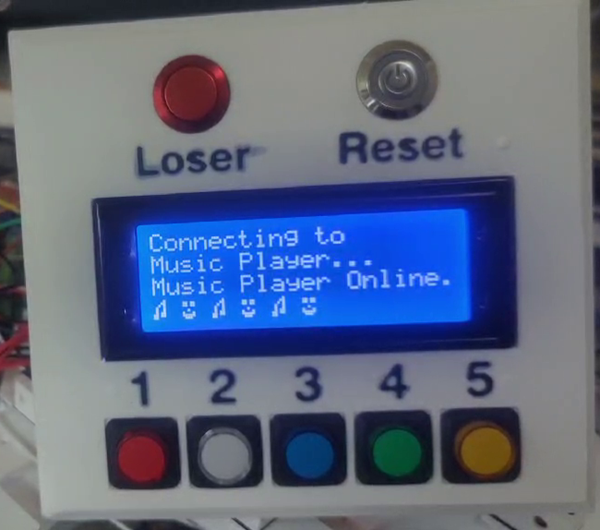
LCD Frame Hooked up
Music Online
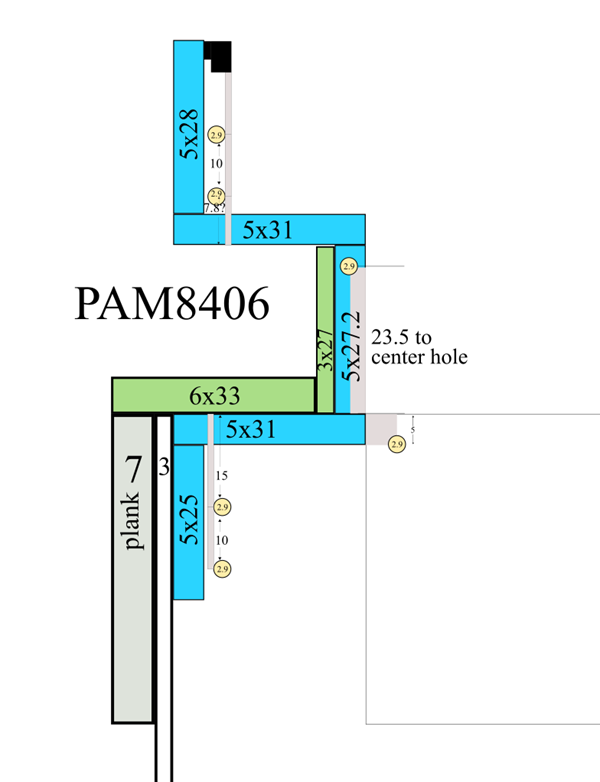
Volume Control - PAM8406
Starting to work on the playfield.

PAM8406 Dimensions
xxx

PAM8406 Marked
xxx
PAM8406 Support Bracket Inkscape Top Measurements
xxx
PAM8406 Support Bracket FusionS ketch Dimensions Top
xxx
PAM8406 Support Bracket Fusion Sketch Dimensions Side
xxx
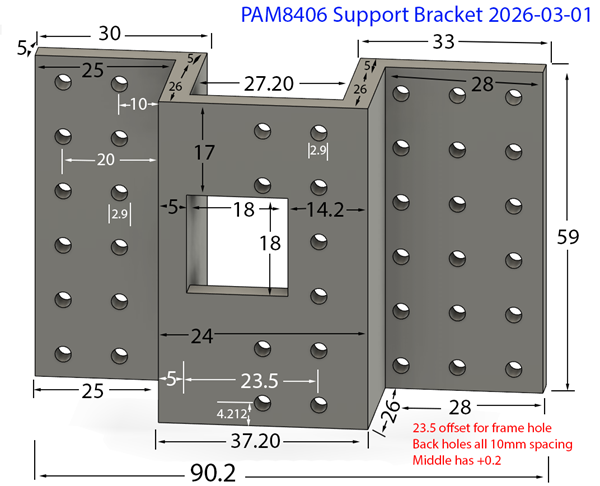
PAM8406 Support Bracket Fusion Sketch Dimensions Side 3D-2-marked
xxx
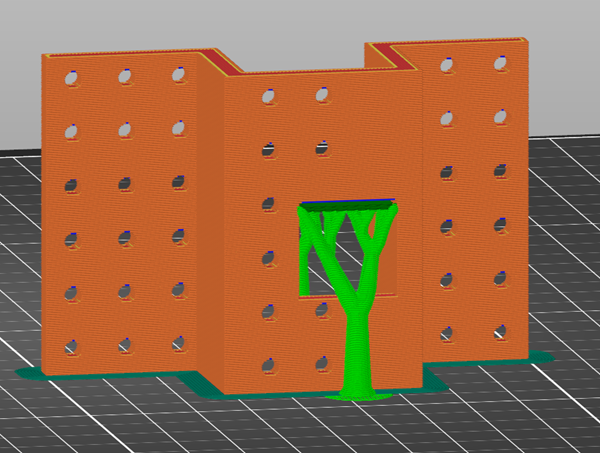
PAM8406 Support Bracket Sliced With Support
Test Draft
.png)
PAM8406 put together test (1)
Test Draft
.png)
PAM8406 put together test (6)
Test Draft

PAM8406 Cover
Hole Sizes
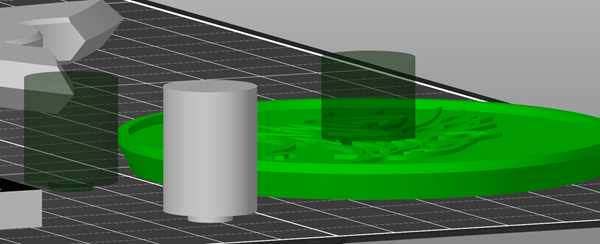
PAM8406 Negative Cut Out
Add Part as a negative Image, insert into coaster.
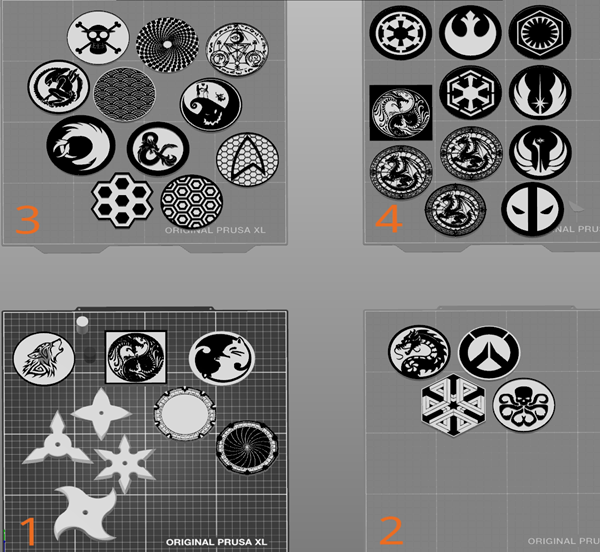
PAM8406 Cover (coasters)
Choose what you like, add hole.
Playfield Undermount
Starting to work on the playfield undermount

Playfield Undermount Speakers Top CAD_Measurements
xxx

Playfield Undermount Speakers Top CAD_LEFTRIGHT
xxx
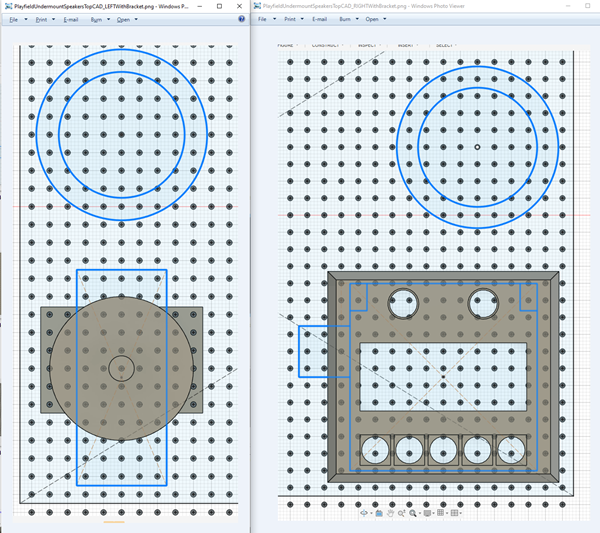
Playfield Undermount Speakers Top CAD_LEFTRIGHT WithB racket
xxx

Playfield Undermount Speakers Top CAD_NoParts
xxx
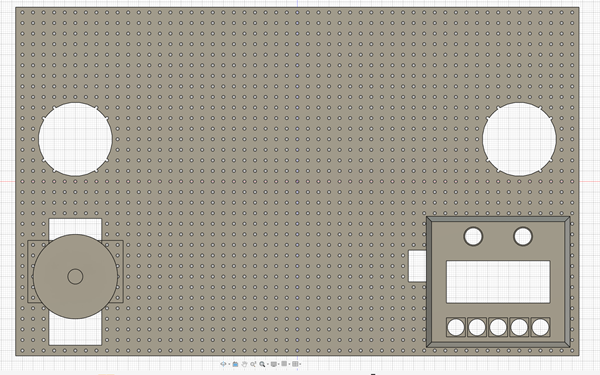
Playfield Undermount Speakers Top CAD_Parts
xxx

Speaker Cutout Center Marking Tool Measurements

Speaker Cutout Center Marking Tool 3D object
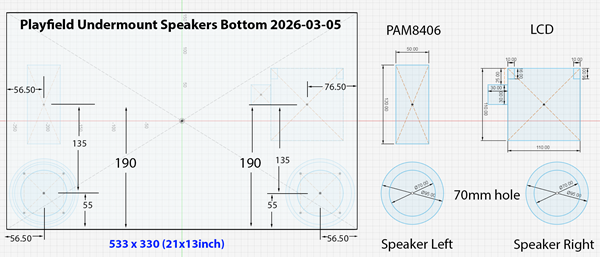
Playfield Undermount Speakers Bottom CAD_Measurements
xxx

Playfield Undermount Speakers Bottom CAD_LEFTRIGHT
xxx
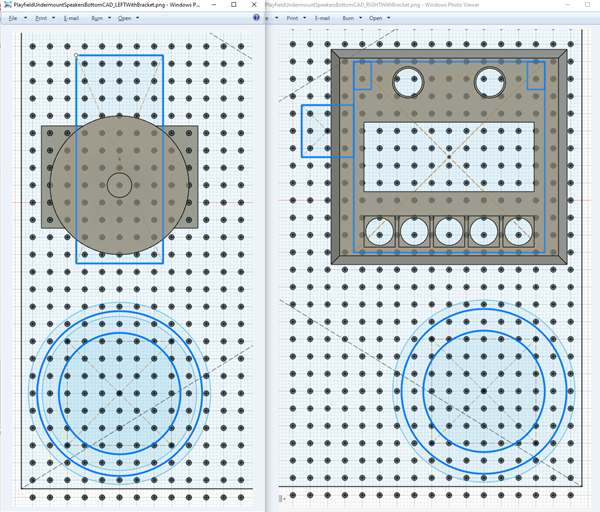
Playfield Undermount Speakers Bottom CAD_LEFTRIGHT With Bracket
xxx

Playfield Undermount Speakers Bottom CAD_NoParts
xxx

Playfield Undermount Speakers Bottom CAD
xxx
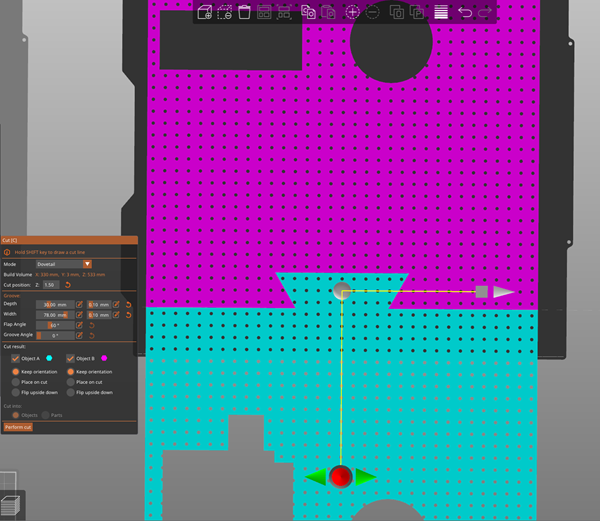
Playfield Undermount Dovetail Cut Specs
How to slice, notice the lines and the holes. Test cut w/ 0.10 mm tolerance.
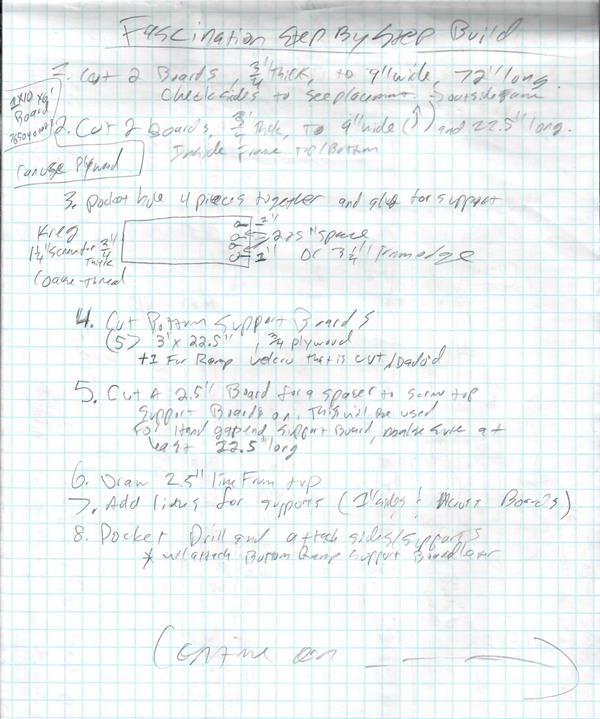
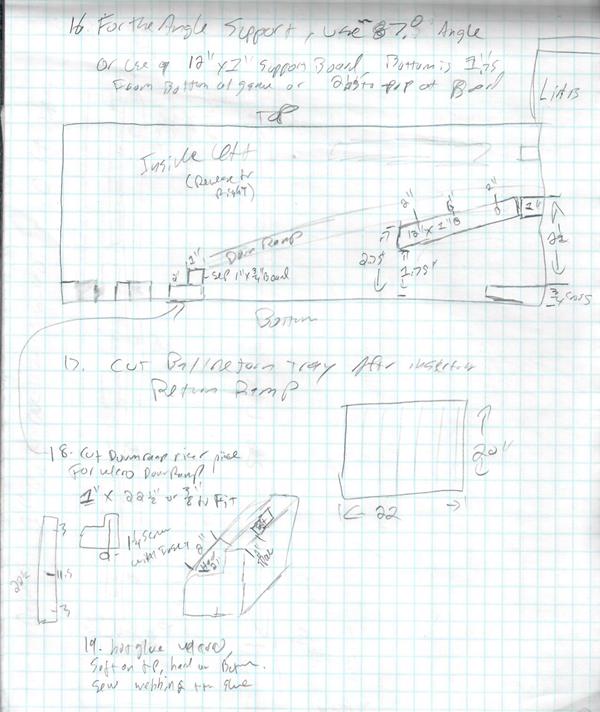
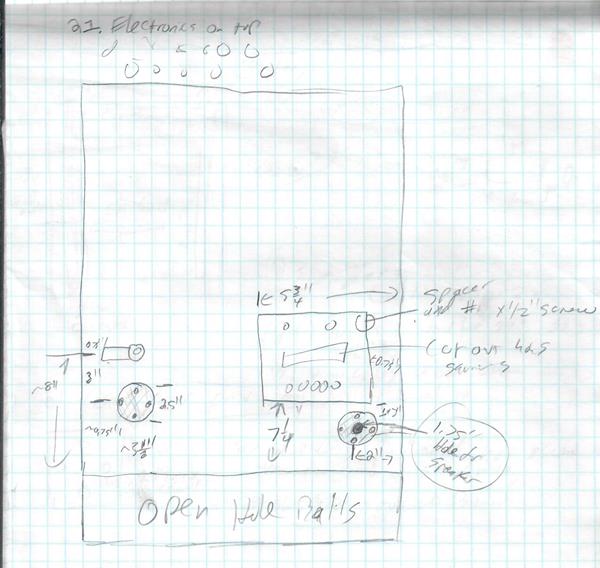
Original Hand Sketches and build process


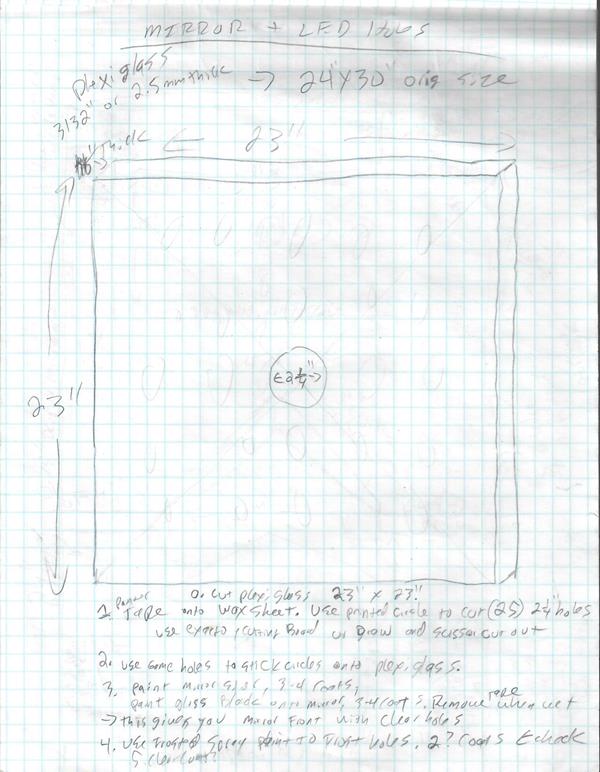
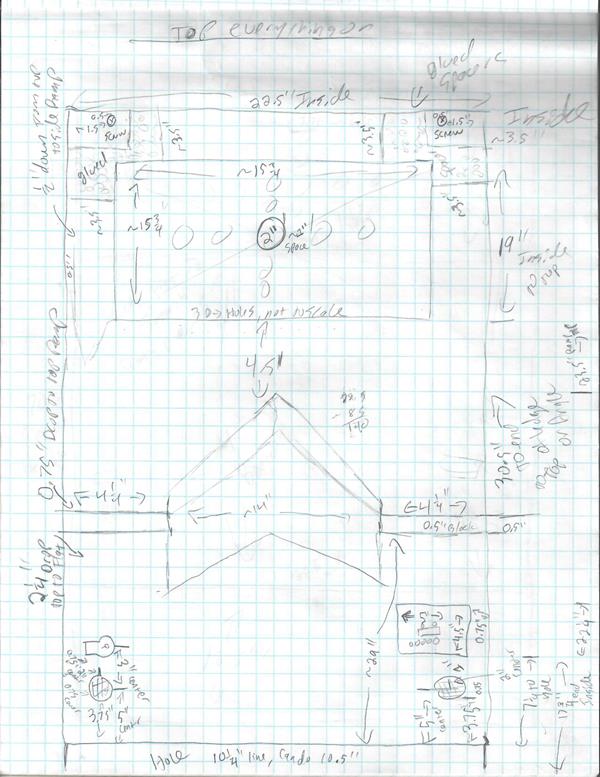
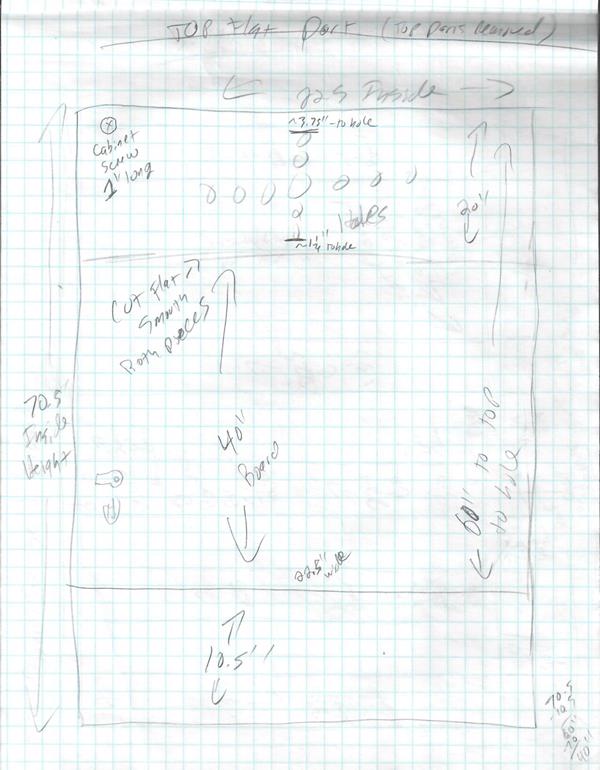
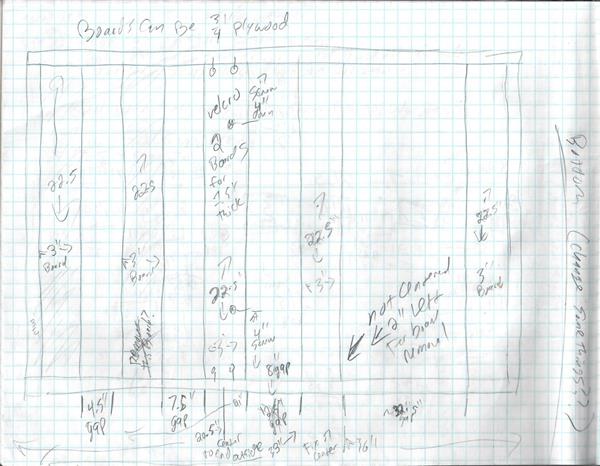


xxx

xxx
xxx